Introducing MonoBox: How & Why I Built My Very Own Music Player
Learn how I built a self-hosted music player, step by step
If you've ever wondered where to start after deciding you want to work on a programming project, then this guide is perfect for you. That's because before I decided to write down this piece, I was in your shoes.
Creating MonoBox was one of the best and most enriching learning experiences I've had. I dealt with new technologies, encountered difficult problems and found creative solutions for them. My goal with this blog is to share the knowledge I've gained with you, as well as to tell you about the process and share, so that I can help and possibly inspire others (and maybe also earn some stars on GitHub ⭐).
If you're eager from the very first moment to see the final result and what I'm going to talk about here, here's the GitHub repo of MonoBox.
Also, check out my other article, which outlines my process and provides guidelines for creating MonoBox: Build Your Own Spotify

Why
I know what you must be thinking - "Wow, another Spotify clone, why the hell would you spend so much time and effort creating something that already exists?". Well, the way I see it, everything is a learning experience. I just really wanted to create a fullstack app, learn some new things, play with ORM and dig into React hooks. I also wanted a project which is complex enough, yet user-friendly and simple to utilize. MonoBox is exactly what I needed.
First Steps
So after deciding on a project idea—to create a self-hosted music player—I believed the abundance of information on the Internet would help me to focus on the technologies and libraries I would need. But in fact, the exact opposite happened. The amount of information I picked up in such a short time of searching, left me feeling disorganized and overwhelmed.

Therefore, I decided to put things in order and categorized the information according to the type of app I want to build, its complexity, company culture and market-relevance.
After careful consideration, I came up with the following results:
Frontend
- React Native - an open-source UI software framework, used to develop applications for multiple different platforms. Having "my hands dirty" with React before, React Native got me hooked (pun intended) from the start.
- JavaScript & TypeScript - TypeScript is basically an extension of JavaScript, as it enables developers to add type enforcement to their code. Moreover, TypeScript provides various other features, like interfaces, type aliases, abstract classes, function overloading, etc.
Back-end & Database
- Python, with FastAPI + SQLModel - FastAPI is a Python web framework for building web APIs, created by the same author of SQLModel (hence the decision to work with both).
- SQLite Database - "Simplicity is the ultimate sophistication" ~Leonardo Da Vinci
Good. Now that we have everything we need to get started, all that remains is to... well, get started!
Getting Started
The first stage, in my opinion, before starting to develop anything is to plan everything as thoroughly as possible. Of course, I expected to encounter bumps, difficulties, and error messages thrown at me along the way, but hey - you have to start somewhere. So, in order to learn all I needed to know to begin coding, I mostly watched live code tutorials or videos that taught the fundamentals of what I needed to know. I saved all of the videos and organized them by what I needed for the Server Side and the Client Side, making notes on what each video contained, so that if I forget something, I can easily find it later. Also, I found a Figma design that I liked and decided to implement in my app.
Oh and don't worry guys, all the information I gathered is ordered and organized in my other article, which you all have access to, so if I'm referring to any GitHub library or repo, you can find it in the link I included at the beginning. 🔝
Baby steps - create a new project
Finally, the time has come to create our initial application, and of course we'll start with the Frontend.
First, I created a React Native application using TypeScript + ESLinter + Prettier (for formatting and clean, readable code) and tested its interactivity by adding a button that displays "Hello World" when clicked.
So far so good. Everything is working. 👍
2 quick but important side notes:
- For a short time, I used my computer's Android Emulator to simulate a mobile device and test my application - which was a nightmare. The emulator was heavy and super laggy; my computer moved slower with the emulator running in the background, and I immediately switched to using my own phone instead, once I discovered I could. So guys, use USB debugging. Trust me. 💪
- I intended to have both the back-end and the app in the same repository. So all of the React Native code was in a directory called
mobile/.
Firsthand experience with designing my screens
Now things are really heating up! It's time to design the app's screens!
Luckily, I found a video series that really explains in great detail how to turn a design in Figma into a React Native app. I found a design I liked and started working with it.
Before moving on to the next stage, I only built one screen at this time for my initial experience.
Some critical points:
- Credit should be given when it's due, so thank you Om Arya, for a fantastic design!
- In this milestone I haven't used any real data from the back-end (because it doesn't exist yet), but mock JSON data (as can be seen in the example below):
- I tried to be as pixel-perfect as possible and didn't overlook small details like fonts.
{
  "songs": [
    {
      "name": "Believer",
      "author": "Imagine Dragons",
      "image": "https://upload.wikimedia.org/wikipedia/he/5/5c/Imagine-Dragons-Believer-art.jpg"
    },
    {
      "name": "Shortwave",
      "author": "Ryan Grigdry",
      "image": "https://m.media-amazon.com/images/M/MV5BZWUxOWIzOTYtMjBhYy00MWFiLWEzYTgtMzRiOTExOTA1ZWQ4XkEyXkFqcGdeQXVyNjI2ODA4MDU@._V1_.jpg"
    },
    ...
  ]
}
"Crafting with care" - Proper build and design of the UI
Now that I had a good sense of how to build React Native screens, I planned out all of my React components, from entire screens to small, reusable components (Yes, I literally grabbed a paper and a pen and started scribbling).
One of the most challenging decisions I had to make in this milestone was whether to implement parts of the components myself or look for a library that would do it for me. I'll admit that I was tempted to experiment with learning and brainstorming a bit, but then I thought to myself: "Why reinvent the wheel?"
I found a repo on GitHub that gathers a large amount of useful components, which helped me choose exactly what I needed.
Make it work
From this point on, I started going a little deeper into the app. I wanted to make it work!
So I tried playing music through the app before moving on to dealing with the back-end; here is where the React Native Track Player library comes into play.
The task of learning how to use the library and understanding it moved from being difficult to, well, less difficult, thanks to thorough documentation and a discord forum full of people who were willing to assist me with any questions.
All screens, mock data
Is everything planned? Is everything thought-through? Great! Let's build all the other screens from the Figma!
I made sure to follow the guidelines I discussed earlier regarding screen design, so building all the other screens went off without a hitch.
Face the music
The moment of truth - it's time to play some songs.
To do this, I found a random audio file link on the Internet and tried to make my app play it from the JSON file, by pressing the ⏯ button.
Up until now, all I've done was build visual screens and components. Getting the app to do even a fraction of what it was designed to do after so many stages of planning would be a significant step for the whole project.
A few drops of sweat and misplaced right brackets later, I was able to get the app to play its first sounds! Someone pinch me so I know I'm not dreaming!

Setting up the back-end
Okay, fine, I can have my player play music statically, but that's not what why we're here.
Do you remember how I mentioned my working rule of thumb at the beginning? no? well then let me remind you: "plan everything as thoroughly as possible". Before jumping into writing the code, I planned out all the REST API endpoints I thought I would need, and for each one I made sure that I have:
- HTTP Method (e.g. GET)
- URL (/songs)
- Request body example
- Response body example
After writing my own queries for my earlier projects, using FastAPI and SQLModel was a welcome change. The libraries operate well together, and their documentation was extremely detailed for me.

"It's not a bug, it's a feature"
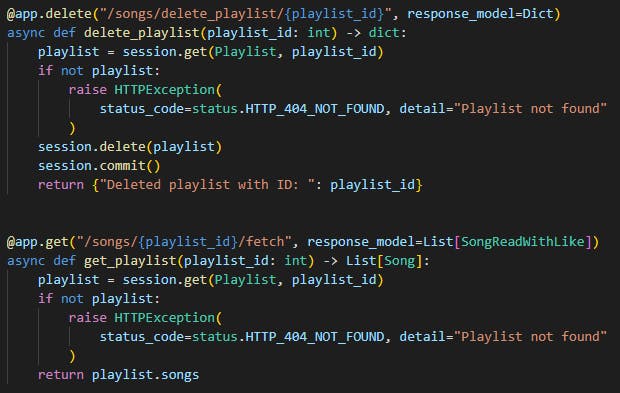
Writing the endpoints had certain challenges, one of which was handling the relationship between the tables in the back-end. Don't get me wrong; I followed along with both the documentation and the YouTube tutorials. However, I was unable to figure out why a particular relation between two tables did not happen automatically as it should.
I spent the entire day attempting to identify the issue when, just as I was about to give up and retire crying to bed, I found someone else on GitHub Issues complaining about the very same problem I was working to resolve. It turns out that the most recent version just has a bug, and all I had to do was downgrade to a slightly older version.
I mean, seriously?!

My point is that no matter how hard I tried, I wouldn't be able to find a solution to my issue, so I started thinking of a detour in order for me to implement what I wanted. The thing is, sometimes, the solution is right under your nose, and the problem is not you. People make mistakes; you simply need to know where to look for them 😉
Final server tweaks
My ability to test all of my endpoints using FastAPI ensured that the requests were successful.
At this point all I have left to do in the server, is to write the main function that scans my songs folder, and uploads, updates and deletes according to the music files that are in it. I used eyeD3 to extract the information I needed from the music files' song info (aka ID3 metadata), including the song's title, the artwork, the artist, etc.
Come together
And now for the really tricky part - getting the whole chain to work properly. A true full-stack application. From the database, through the server to the user, and all the way back.
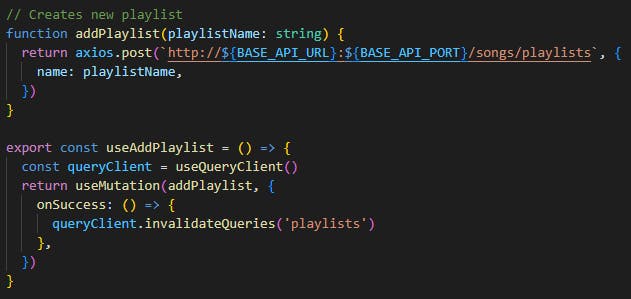
I started by writing down all the different fetch functions where I needed them. Then, After noticing that I had written the same functions several times (or at least in a similar way), I turned them into a custom hook to suit the needs of the application, and consolidated them all into one file of useful functions.
I made sure that everything works and that the app really gets all the information it needs from the database, and of course that everything is displayed as it should be. I then moved on to check that all the other methods are working (i.e. POST, DELETE, etc.). And that's where I ran into a "tech debt".
Integrating React Query into the code
I've found that while I initially receive all of my information when the app loads, when I attempt to update it in any way, the change only affects the database and not the app itself. This occurs because I never receive the most recent data from the database. I don't have any refetch requests in my app after the initial loading 🤔
A quick Google search gave me a very clear result: React Query. And more precisely, the invalidation method of React Query, which essentially, according to the documentation:
"Lets you intelligently mark queries as stale and potentially refetch them too!"
And that's exactly what I did. The choice I had to make was whether to utilize React Query for all front-end requests or to change the code selectively where I was required to use invalidation.
Fortunately, since I had previously consolidated all my code in one place, it was easy for me to replace all of it. The result was a shorter, clearer, and more readable code. And of course I also solved the problem 😎

Conclusion
That's all, folks!
I hope I have helped you and given you enough direction for your project, whether it be a music player or any other idea that comes to your mind.
I tried to summarize as much as I could and yet expand on the parts that seemed more relevant, because although reading this article takes a few minutes, the process of learning the various tools, languages and the best practices for work, took me close to 4 months.
Even so I didn't detail every moment when I felt dejected and that this project was bigger than me, you can be sure there were many such moments. I apologize for not being able to recall them all; after all, learning takes time, and I made a lot of mistakes along the way. And precisely because of this, I think your takeaway from this article should be to never give up. you will get there in the end - and this feeling of success will be amazing. Take your time, hone your skills.
Now all that's left for you to do is push the project to GitHub, make a killer readme for it, and be proud of what you've created.
Oh, and one last thing!
Did you notice how I hardly used the name "MonoBox" at all? That's because in this whole long process, I didn't think to give my app a name. I constantly referred to it as "The music player I'm building" or "My React Native app". In the end, you want your project to stand out above the others, and you want it to be unique and special. Market it and think of it as a product. Who wouldn't want to take a look at it?
Let your creativity run wild.
Thank you for taking the time to read what I had to say. You can follow me on LinkedIn, GitHub and you are more than welcome to star my projects there 🌟
I would love to hear from you, so let me know what you think in the comments, I'll be more than happy to help you out. 😃

